Showing posts with label Free Pattern. Show all posts

Thursday, September 17, 2015

Black watch tiered skirt #7

#1 Blue
#2, 3, 4 Hello Goth! 3 Gray tiered skirts
#5 Household sewing pink and gray tiered skirt
#6 Blue again

Is it a command performance if she isn't royalty?  How about a demand performance?

Anyway, I started with Bad Dad's badly frayed black watch plaid shirt.  Over the years, it had deteriorated from a lightweight canvas to a poplin-like weight and softness.
Auditioning fabrics.
While I was auditioning fabrics, I came across this 1/4 yard scrap of Jinny Beyer quilting cotton.  The last time I bought Jinny Beyer fabric, I was in grad school.  My JB purveyor back then was Elfriede's Fine Fabrics.

I bought this fabric nearly 20 years ago for a green + purple tessellated quilt that now lives with my SIL.  I saved the scrap, moved it to LA, and then moved it back to Boulder--only 1 block from the store where I originally purchased it.  The scrap, in the form of a finished skirt, is going back to LA.

Well-traveled fabric.
Enough about the fabric.  You want to see the finished skirt.  Notice that I swapped out the midnight navy pin dots for a solid black poplin.
Each side has a flash of white.
Another view from a different side.
Spread out on the floor.
I used a pleating foot, set to pleat every 6th stitch.  I made a test sample and got a 1.67 ratio of unpleated to pleated length using a scrap of the swirly quilting cotton.  That was a bit more than I wanted so I increased the stitch length from 2.7 to 2.8 mm.  Mistake.

Machine pleaters work best on fabrics with 'grip' such as quilting cotton.  They pleat much less effectively on slippery fabric such as the fine cotton poplin at the top.

I start with a 9" deep top tier cut at 120-125% of the hip width of the wearer.  The other 3 tiers are 8" deep.  After making the waist casing, I end up with 4 tiers about 7" deep.

Warning:  At a 1.67 ratio, that means a finished hem of ~200".

The recycled shirt fabric will wear out fastest, so arrange those on the bottom.  When they rip, it won't be a major embarrassment.  ;-)

Cut the shirt bottom 9" deep at the center fronts.  The sides curve up so your overall skirt length will be 29-31".  Reuse shirt hems to reduce the amount of hemming you need to do.  Hem the fabric strips attached to the shirt hems before joining them!

If the selvedges are an even tension, leave them in place.  You can use their non-fraying edges and the shirt placket to encase the raw edges of other pieces for a clean finish.
Reuse hem and plackets.
Clean finish in two steps:

  1. Sew the RS of the raw edge to the WS of the clean edge, with the clean edge extending about .5".
  2. Flip the raw edged piece so the RS is behind the clean edged piece and topstitch from the RS.

Pocket flap button resewn after assembly.
Cut the buttons off before assembly because they get in the way.  After assembly, I sewed the button for the pocket flap back on.
Interior view of pocket.
I think inclusion of the pocket is a fun detail.  When you leave pockets on, make sure they land at the unpleated bottom edge or else it will get too bulky.  Set the pleater to 0 when you cross seams and shirt plackets.  You don't need to add pleats and bulk at these places.
Clean-finished interior with one serged vertical seam.
I like the way the selvedge gives a flash of white.
Use selvedges, too.
I bought two t-shirts at Goodwill that perfectly match the skirt.  I plan to make a mock-wrap shirt to complete the outfit.
One of two thrifted shirts perfectly color-matched for top.
DD says that the wabi-sabi rips and frays are an integral part of the design of these skirts.  As they rip, I will layer other fabrics and patch it up as I did here.

This skirt took 5 hours of work time spread over 6 hours of elapsed time.  That's 300 minutes of work for a skirt that is already frayed and will continue to degrade.  This isn't clothing construction; this is performance art.

I've been following Handmade by Carolyn's One year, one outfit project.  She's making an outfit entirely made up of components sourced in her local environment of Western Australia.  That is not easy in this day of globalization.  Zippers and buttons are made in only a few places in the world now.  She's making everything from scratch--right down to carving her own shoe soles from local wood.  I am in awe of everything she does.

My particular performance art shtick* is to see what I can make from castoffs.  Bad dad wore the shirt for years until the visible fraying wasn't fit for public wear.  The small sprigged print is leftover from a quilt project.

The other two fabrics come from odd-jobbers in LA.  The black poplin appears to be a fabric sample used in a wash/shrinkage test and the swirly black/green quilting cotton has small printing flaws.  To most people, the components are textile waste.  To DD, this is her signature look.  To me, this is how I assuage my enviroguilt for living in two places** and flying back and forth.

* Carolyn, I don't mean to call your project shtick.  I'm only saying that my work is shtick.

** To be fair, two-PhD families have a very rough time finding jobs in the same place so this living arrangement isn't something we have control over.  That doesn't make the enviroguilt completely disappear.

Tuesday, March 31, 2015

Cowl Finished

I finished a couple of projects last weekend. Neither took very long, but they attest to the psychological power of making lists instead of moving on to the next shiny thing.

The cowl shown here on the needles is complete, with ends woven in and wet-blocked.
It's about a foot longer than I had hoped.  That's what I get for not wet-blocking my swatch before calculating the number of stitches to cast on.  (12 st repeat * 22 repeats)
I messed up my first attempt with a 360 degree complete twist.  Frogging these yarns was not easy and I lost some fancy yarn yardage.  That mistake, and the additional length, meant the cowl lost some width.
But it looks quite substantial (yet light!) worn doubled.
I made this with the intention of blinging up my black shirts and knit tops. But, that wouldn't photograph well.

What do you think about mauve? Matronly? Timeless? The shirt still has the store tags on it, despite languishing in my closet for years.  Do I dare wear mauve in public?

Pattern (see copyright stuff at the footer of the page):
  1. With plain yarn: cast on your desired number of 12 stitch repeats on a long circular needle, placing markers every 12 stitches and stitch counter or other marker at start of round.
  2. Knit 8-10 rows (4-5 ridges) garter stitch back and forth.
  3. Place stitches on 2 long circular needles to ensure that there are no twists.  Join into the round.
  4. With fancy yarn, set up pattern (Row 1 of 4 row repeat): 
    • *k4, centered double decrease, k4, k1 into bar between stitches, k1, slide marker, k1 into bar between stitches*, *repeat between*
    • Centered double decrease:  slide two stitches together from L to R needles as if to k2tog, k1, slip two slipped stitches over the knitted stitch.  This doesn't sound like it will create a row of centered stitches, but it does.
    • For larger holes, use a yo instead of the lifted bar increase.  For no holes, use a pair of m1R and m1L.
    • Row 2: at start of round, k1 into bar between stitches, knit to end of round.
    • Row 3: repeat Row 1
    • Row 4: repeat Row 2
  5. With plain yarn, knit rows 1-2 three times for 6 rows total.
  6. Repeat rows 1-10 till desired width or out of yarn, ending with the fancy yarn.
  7. Knit 8-10 rows (4-5 ridges) garter stitch back and forth.
  8. Seam garter selvedge edges together, weave in ends.
  9. Wet block, soaking in warm water and then stretching firmly to open the stitches.

Monday, August 27, 2012

Loop

I succumbed to impulse purchases at Elfriede's Fine Fabrics this summer.  This 1/2 yard piece of 54" wide silk shot chiffon (fuchsia in one direction, black in the other) was only $4 so it came home with me.  It would have made a rather short scarf on it's own.

But, then I saw Habu N-80, a silk-wrapped merino yarn, at Twist during their summer sale.  I bought a 1 oz skein (187 yds), cast on 40 sts and knit in elongated seed stitch on size 7 (4.5 mm) needles until I ran out of yarn.

I sewed the chiffon into a tube in the long direction and inserted the knit piece in between the short ends to form a tube about 80" in circumference and 9" wide.  It can be worn looped three times (above) or twice (below).

I just love the textural contrast between the smooth chiffon and the seed stitched wool.  The wool is surprisingly not scratchy after I washed and blocked it (before sewing it to the chiffon).

Does your stash grow while you sleep?  I do not understand how this ~2 yard piece of silk came to be in my luggage.  When I unpacked my purchases from the trip, there it was.  Where did it come from?

@ Shams: The silk was folded up in a 1 quart ziploc bag, which stores don't usually use.  It's extremely odd.  I don't think that Stone Mountain and Daughter gifted this to me--though, in the 1980s, they used to gift me quite a bit of fabric with their generous cuts.  I actually thought that I was able to buy 1/4-1/3 less fabric all the time because I was so efficient with layout.  Another seamster insisted that I measure my fabric and she was right.  Remember the rule about "a yard and a thumb"?  Well, the cutters at SM&D had very fat thumbs for their regular customers.  I shopped there both for my personal needs and for the costume shops of Berkeley Shakespeare and Repertory so the cutters knew me.

Monday, February 08, 2010

Two Issey Miyake Skirts

You ask, I answer.

Here is a schematic of my skirt made from Vogue 1256, a vintage Issey Miyake dress.  The original pattern had a drawstring casing at the junction between the bodice and the skirt.  I made a tunnel elastic waistband.

Construction Steps
  1. Sew center seams and make pleats.  Baste pleats.
  2. Staystitch inset corners, then clip to stitching.
  3. Sew rectangular pocket back pieces to both front and back.
  4. Stitch pocket sides, drape top and side seams.
  5. Attach a tunnel elastic waistband (a tube of fabric the length of the waist opening). Insert elastic.
  6. Trim corners, finish edges, hem
Because Marie-Christine asked nicely, I decided to draw a schematic for a second, bonus skirt.  Vogue 1256 didn't have a copyright YYYY notice on the envelope, so I didn't know the exact year of the pattern.  However, the $9 price on the envelope places it in the 1980s.

I think it was near 1984 because of this skirt that I tried on in a boutique on College Avenue in Berkeley in 1984.  It was made of cotton knit and black grosgrain ribbon.  I am not sure about the stripe orientation.  I think it went horizontally, but I thought it would have looked better vertically.  Knit-in stripes usually go horizontally, so that the machines knit with only one color at a time.

I am not sure which way the stretch in the skirt went.  It was 25+ years ago, and I think I should get a bye on that.  I do remember the very soft cream and grey fabric and black grosgrain ribbon.  I recall now that the stripes went horizontally, and the skirt appeared to use the full 60" width of knit fabric.  I  thought it was weird the stripes went in an unflattering direction.  I had no idea about machine knitting back then.

Topologically, it is the same as the skirt I just made.  There is no pocket and the drape portion is proportionately wider, almost 1/3 of the full width of the skirt.  (That's why I put 1/3+ or 1/3- on the drawing.)

Happy sewing and send me a picture or link to your skirts!
When I saw this knit skirt, I had never heard of Issey Miyake.  The window display intrigued me. I went right into the store and tried the skirt on, even though I couldn't afford it. I think the boutique was called Miki, but it may no longer exist. They sold the kind of cool clothes that I couldn't afford back then, and that don't fit my conservative workplace of today. Sigh. Life is so asynchronous.

A year later, SFMOMA devoted the entire top floor to a retrospective of Issey Miyake designs.  I blogged about that in Imagery from the Past.

Saturday, August 01, 2009

Apron Pattern

I never have enough pockets. I am also a messy cook. I don't care if it makes me look like a retro housewife. I like to wear an apron. Whenever my one apron was in the wash, I felt the loss acutely. Now I have enough to tide me over for a week.
I made the one on the right over a decade ago. I couldn't find the pattern that I drafted back then, so I drafted a new one. If you feel inclined to make your own, click on the pattern below to print it out in higher resolution. You can size the pockets to your own taste. The original had flat pockets, but the two new ones have pleated pockets on the sides. The center pocket is not as deep as the side ones. It is sized to hold a recipe index card.
Cut the straps the width in the pattern. But add hem allowances for the apron and pocket pieces!

The aprons met with Iris' seal of approval. She asked if we could share. No way am I gonna share the animal print one.

I will have to make more and stitch tucks in the neck strap that I can release as she grows. This would be a good project to make together. If you have been looking at edges of the sewing room photos, you can see that my stash can supply quite a few aprons. ;-)

Asides:
Joan pointed out that I forgot to give the measurement from top hem to bottom hem. Length will vary with the height of the wearer, but mine is 31" and I am 5'5" tall.

The apron takes slightly more than a yard of fabric.  6 napkins takes a bit less than a yard.  Why not buy 2 and make a set?  They make great gifts. 

Black and White shows me modeling one of the aprons.

I picked up an alarming amount of fabric last month at SAS Fabrics. $60 buys you a lot of fabric when they are selling it at $2.99 per yard (silks) and $2.99-$4.99 per pound for the rest of the stuff.

They had a bunch of sample cuts of cotton lawn from Caravel Fabrics. Cotton lawn weighs next to nothing so they were a steal.
There were some remnants of silk shantung for $2.99 per yard.Sample cuts of stretch cotton twill and poplin from hi-fashion fabrics and other suppliers to industry.
Ultra-soft cotton jersey sitting on top of a cotton/linen stripe I bought elsewhere.
I bought some the swiss dotted lawn in both white (not pictured) and black (2nd from bottom). The top piece is real 100% cotton seersucker. The bengaline below it is a small remnant that will make a good trim. I am disappointed with the rayon piece on the bottom. However, I am not going to complain about one dud. You have to agree, that is a whole lot of nice fabric for $60 or so.

Tuesday, January 27, 2009

Möbius Mini

Actually, I was aiming for a Möbius shoulder wrap for myself, but Cathy at Twist Yarns accidentally gave me the instructions for the children's version. When we realized her error, I went back to the store for a second skein of Malabrigo merino lace, which she gave me gratis. She felt badly about the amount of time I spent, working moss stitch in lace weight.
  • yarn: 8 grams Malabrigo merino lace
  • color: Vaa
  • needle*: 47" size 9 Addi turbos, switched to 32" Knitpicks 9/7 when it was wide enough to fit comfortably
  • pattern: Moebius cast on 100 double-ended stitches plus the initial slip knot, moss stitch (201 sts/round of knit 1, purl 1) until it is wide enough. This one is ~10" wide.
  • pattern for women: Moebius cast on 160 sts + slip knot, moss stitch (321 sts/round) until you run out of yarn. Try a size 8 needle to start and adjust for a pleasing stretchiness. Wrap will measure ~37" along the middle spine, and be ~14" wide.
  • Use a stretchy bind off**
My sister posted an excellent pictorial how-to for the Möbius cast on (MCO). She also gave me A Treasury of Magical Knitting by Cat Bordhi. Even then, it is difficult to attain the exact number of desired stitches. I ended up with 158*2+1 stitches.

Note that each MCO creates a double ended stitch. You will knit first one side, then the other. If you look at a Möbius strip, your MCO will be at the center spine. Then you will knit outwards along both sides of the spine.

** I bind off with a crochet hook, rather than move the stitches back and forth between the R and L needle. I am lazy that way. The three needle bind off using a crochet hook instead of a third needle taught me that the bind off is equivalent to a crochet slip stitch.
  1. knit two stitches, keeping in pattern and leave stitches on hook
  2. yarn over, pull through both loops,
  3. knit or purl one stitch
  4. yarn over, pull through both loops...
Cathy originally told me to (MCO) 80 stitches and moss stitch with a size 8 needle. My swatch told me that would be awfully small, so I MCO 100 stitches and went up to a size 9 needle. Even then, it better fits Iris than myself. I am using MCO 159 stitches and a size 7 needle for mine. I usually go one needle size down because I knit loosely in Continental style. (I learned to knit while living in Germany, long story.)

See my sister's Möbius basket. Unbelievably cool!

Sunday, February 03, 2008

Not So Minimalist Laptop Case

Now that I work in a computer science research group, my new boss ordered a fancy laptop for me. The standard issue laptop case at my company weighs more than the laptop. I declined one and decided to make my own.

The minimalism of the camera case bothered me somewhat. With all those wonderful colors to play with, why did I make it out of one monochromatic piece? I vowed to lavish a little bit more time on the laptop case.

It is still monochromatic, but much less boring. I call this the front because the first side didn't look right. I forgot how to sew a stem stitch; after consulting with by Judith Baker Montano's Elegant Stitches, it came back.

I cut apart two thrift store sweaters that had been run through the washer and dryer a couple of times. I laid the laptop on one sweater and drew lines around it (allowing for the thickness of the laptop and the seam allowance) with a purple air-erasable pen. The laptop will sit in my backpack or rolling briefcase the tall way. I sewed the bottom seam first.

Then I cut a thick jacquard piece from a second sweater to pad the bottom. I serged the long sides of the rectangle and topstitched it to the bottom of the case.

There were leftover pieces on the side which I cut freehand with the rotary cutter into leaves. I serged the edges of one leaf and decided I preferred them raw-edged. I embroidered stems with stem stitch and sewed the leaves down the middle with a running stitch. I added some leaf veins. You can see better from the back.

Finally, I sewed the side seams. Don't forget to fold over the top flap on the INSIDE when you sew the side seams!

Not so minimalist now. I have to fly to the east coast two weeks in a row for NASA meetings this month. I feel really guilty about my carbon footprint, but I can't wait to show off my new case.

In keeping with the slow life, all materials were salvaged. The sweaters had holes in them and were bought for $1-$2 a piece in the summer, when no one else wanted them. The charcoal yarn probably came from my sister in one of her care packages of leftover bits and pieces. It feels like merino/silk. I wish she had sent more. ;-)

Thursday, December 20, 2007

Fiber and Air Free Pattern

I am not making any holiday presents this year. But, in case you want to make any last minute presents, I am posting instructions for a quick gift made of recycled bits of fabric, ribbon, yarns, thread and air. Mostly air.

I posted instructions a long time ago, on my sister's blog. See the
picture of Iris in this scarf.


General Tips:

I generally followed the directions given in the Sew News Threads of Distinction article. I also searched the web and read that some people had trouble removing the stabilizer completely or removing the residue from the basting spray. I decided to use plain old Solvy instead of the thicker Ultra Solvy. Sure enough, it dissolved fairly easily when swished around in a sink full of warm water and a little shampoo.

Further cruising seemed to indicate that the basting spray does not dissolve easily in water so I used it very lightly. I used the very minimal amount of spray that was still tacky enough to hold the fibers in place as I worked. Other people's blogs indicate that the brand of basting spray matters. I stayed away from the brand that people had trouble with and used the June Tailor basting spray as recommended by the Threads of Distinction article.

The ToD instructions say to spray both layers of Solvy. But, if you spray both layers of Solvy, then how do you put the top layer of Solvy on without getting a wrinkled mess? I enlisted the help of a friend and we still had trouble laying it on straight and wrinkle-free. For the second scarf, I sprayed only the bottom layer of Solvy with basting glue. I rolled the top layer of Solvy up and then carefully unrolled it over the fibers and bottom layer, starting at one scarf end and finishing at the other.

Machine stitching the grid can be rather tedious. If your sewing machine chews up metallic threads in the needle, try putting it in the bobbin instead. Rather than buying multi-colored embroidery thread, you can use up bits of leftover colors of sewing thread in multiple colors. Different colors of thread in the bobbin and needle produce an interesting twisted color effect.

Materials:

  1. Solvy
    1. For a 9” wide scarf, buy enough yardage for the desired length of the scarf.
    2. For an 18” wide stole, buy double the length of the stole.
  2. Ribbon yarn
    1. 5 times the length of the scarf
    2. 8-10 times the length of the stole
  3. Bits of lightweight fabrics
  4. Small amounts of different yarns
    1. Try some fluffy eyelash and/or recycled silk yarn
  5. Sewing and embroidery thread in coordinating colors.

Instructions:

  1. Cut a piece of 19" wide Sulky Solvy to the length of your scarf.
  2. Cut it in half lengthwise to two 9.5" wide pieces.
  3. Roll one piece up and set it aside.
  4. Lay the other piece out on newspaper and spray enough June Tailor basting spray to make it tacky enough to hold your fibers down.
  5. Move the newspaper out of the way (so your fibers don't stick to the newspaper).
  6. Weight the tacky Solvy down with sewing weights at the corners to keep it taut.
  7. Lay ribbon or ribbon yarn around the perimeter of your scarf.
  8. Lay a few pieces of ribbon lengthwise to give it a bit more structure.
  9. Lay your other yarns, fibers, and fabric bits down in any way that appeals to you.
  10. Admire your work. Fill in sparse areas because you want the density of the scarf to be roughly even and balanced.
  11. Carefully unroll the remaining piece of Solvy over your fiber collage.
  12. Pin as necessary to keep the sandwich together.
  13. Sew with a medium straight stitch (~2.8 mm) around the perimeter of your piece.
  14. Sew a mesh (both lengthwise and crosswise) about ½ to ¾” apart.
  15. Admire your work. If there are areas where the grid is spaced too far apart, fill in the area with more stitching.
  16. Swish the piece in a sink full of warm water and a few drops of shampoo until the Solvy is completely dissolved. Rinse.
  17. Roll the piece up in a towel to blot the water out, and then air-dry.
  18. Admire your work.
Enjoy, and please use this pattern only for noncommercial use, etc. And send photos of your completed work.

Sunday, October 14, 2007

Aspen Leaf Scarf Free Pattern

Walking my watershed, I saw plenty of signs of autumn. That means it is time to bring out the Aspen Leaf Scarf.

Originally, I posted the free pattern. But, my LYS, the Slipt Stitch, asked if they could sell the pattern. They can't sell what I am already giving away for free, so I took the pattern off my blog. However, I made a whopping $9 off that pattern; I better keep my day job.

I would rather repost the pattern here and see many people enjoy their own Aspen Leaf Scarf. If you make the scarf, please leave a comment with a link to a picture of your scarf. And the usual stuff applies. You can use the pattern for personal use only; do not sell the scarf; do give credit to badmomgoodmom for the pattern-I am sensitive about my intellectual property.

As my other patterns sell out at the Slipt Stitch, I will repost them here rather than restock the store. Check back periodically.

Aspen Leaf Laurel Scarf

Gauge: not essential, but super-bulky or 2 strands of worsted yarn held together and knit on size 15 needles make a ~ 4 ¼ inch wide leaf.

  1. CO 3 stitches
  2. P3
  3. K1,YO,K1,YO,K1
  4. P5
  5. K2,YO,K1,YO,K2
  6. P7
  7. K3,YO,K1,YO,K3
  8. P9
  9. K4,YO,K1,YO,K4
  10. P11
  11. K5,YO,K1,YO,K5
  12. P13
  13. K13
  14. P13
  15. K5, S2,K1,P2SSO,K5
  16. P11
  17. K4, S2,K1,P2SSO,K4
  18. P9
  19. K3, S2,K1,P2SSO,K3
  20. P7
  21. K2, S2,K1,P2SSO,K2
  22. P5
  23. K1, S2,K1,P2SSO,K1
  24. P3

Repeat rows 3-24 until you are happy with the length of the laurel scarf. (I used ¾ of a skein of Wool-ease Thick & Quick.)

To end, S2,K1,P2SSO and pull yarn through last stitch.

Darn in ends.

Block.

The leaves will curl, just like real leaves do.

Glossary of terms:
CO long tail cast on
K knit
P purl
S slip
S2,K1,P2SSO slip 2 stitches knitwise together (like you are starting a K2tog), knit 1 stitch, pass 2 slipped stitches over the knit stitch. This forms a centered double decrease.

© 2006 badmomgoodmom, all rights reserved.

Saturday, October 14, 2006

Fall Shrug FO

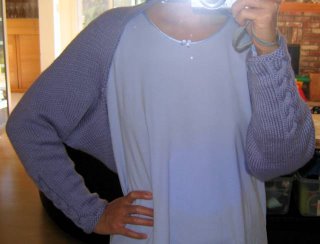
I tried on this Eileen Fisher shrug last month. I liked the simplicity of the design very much, but not enough to spend $258. The yarn was certainly soft, but I find mohair itchy. Plus, at that price, I felt like it should have been manufactured in a higher wage country. (Click here to read an article about the workings of the Eileen Fisher supply chain.)

I set out to make my own. Ann had sent me some oddball yarns and I fell in love with the soft feel of cashmerino. I bought 6 balls of Debbie Bliss Cashmerino aran in light lavender from Beach Knitting in Manhattan Beach and set to work. I wanted a shrug with full-length sleeves with a cable detail at the cuff. I ran out of yarn. I stopped by the Slipt Stitch in El Segundo and bought a 7th ball in another dye lot, but it was a perfect color match anyway. (Cashmerino aran is $8.50 per ball at BK and $7 per ball at SS.)

I scanned the sleeve so you can see the braided cable detail.

The shrug doesn't resemble the EF one by the time I tweaked it to suit me. But it makes a nice bedjacket while I recover from the cold. (Please ignore the messy house. I am sick and my husband just got back from a week-long field trip.)


Addendum
My sister asked for my pattern so I wrote it up and scanned in my schematic. Leave a comment with your email address if you also want it.

Her real-life neighbor, Penny, had the same idea. Read what she did on her blog.