 We had another tie-dye party yesterday. My dad and his friend came for a visit today and we wore our tie-dye proudly. First we ate dimsum at Regal Palace Seafood in Lomita, then we went to the Point Vicente Interpretive Center. We were very favorably impressed with the exhibits at the newly reopened center. That's the Point Vicente lighthouse behind us.
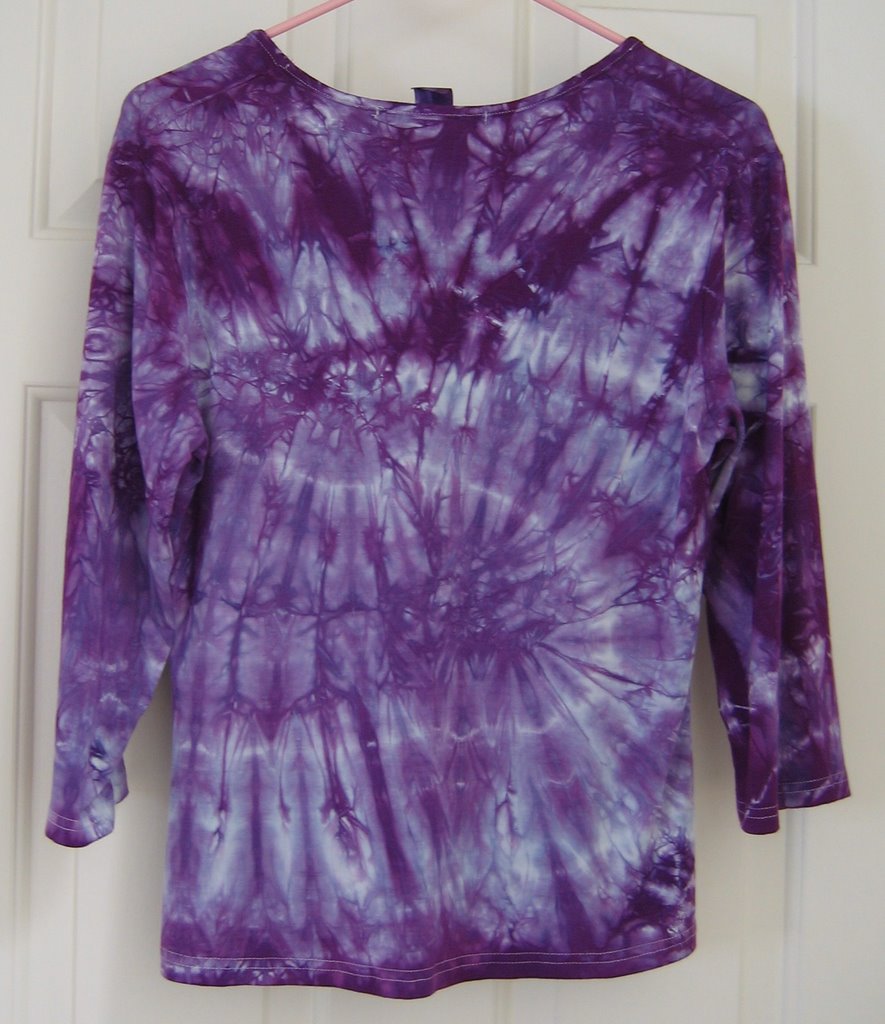
Here is the back of my T-shirt.
 Here is a better shot of Mark and Iris in their new duds.
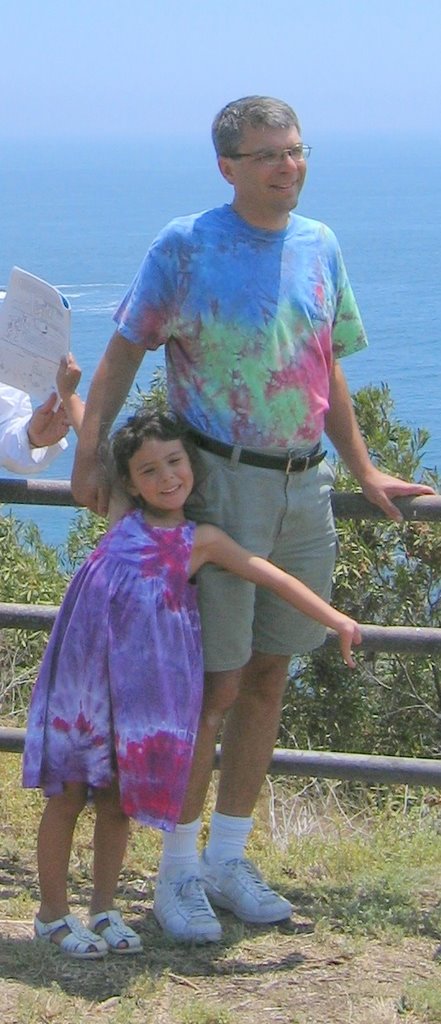
Some friends had a baby which means more onesies. Iris received some new underwear earlier this year. Each pack came with a few white ones which she refused to wear unless I tie-dyed them. So I tossed a pair of white undies into the ziploc bag with each onesie. The panties are placed next to their corresponding fraternal twin onesie.
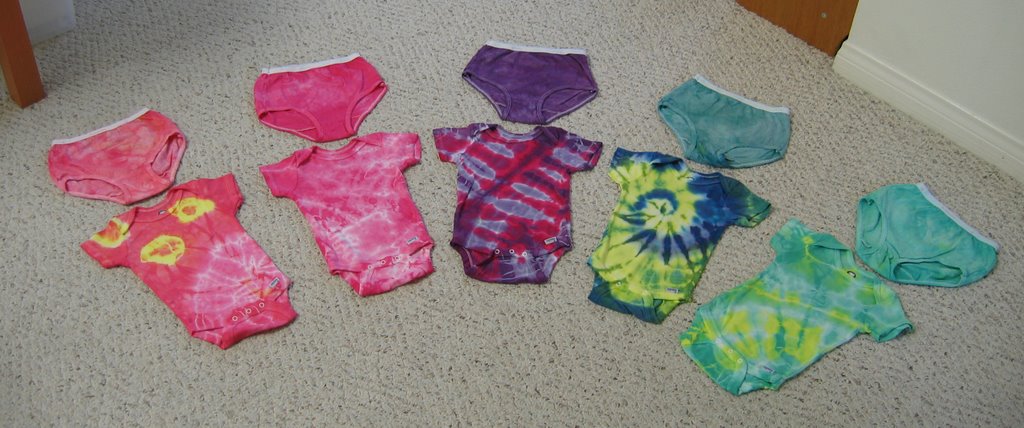
The purple and fuchsia onesie on the left is my personal favorite but the blue and yellow swirl is a close second.

The mother of a recipient of an earlier batch of onesies told me that visual texture near the bottom was great. It helps camouflage diaper blowout accidents. So I got a little crazy with the scrunching and rubber bands near the bottoms.

The technical stuff:
I used the same dyes and solutions as last time. I bought a second, very informative book about tie-dye from Dharma Trading which explained how to achieve many new (to me) visual textures. I used the ying-yang twist on my t-shirt which was thrown into a ziploc bag with some soda ash solution (SAS) and Deep Purple dye. (The first book I bought about tie-dye was also very useful and I highly recommend it.)
The new book also showed how to achieve the crystal effect on Mark's shirt. I cheated a bit by stuffing the whole carefully scrunched shirt into the plastic shoe storage box instead of wrapping rubber bands to hold the scrunches in place. Then I poured Sapphire Blue, Emerald Green and Burgundy dye solution on the shirt, being careful not to overlap the colors. Next, I poured SAS into the box to just cover the shirt. Lastly, I put plastic wrap over the shirt and pressed down with my hand on the shirt. This made the solution and dyes rise and bleed together a bit.
For the onesies, from left to right:
- Lemon Yellow was splashed on selected portions and the whole thing went into a ziploc with SAS and Fuchsia Red dye.
- SAS and Fuchsia Red dye.
- Fuchsia Red dye was poured on one side of the fan folds, then the whole thing went into a ziploc with SAS and Deep Purple dye.
- Lemon Yellow and Sapphire Blue dye solutions were poured onto one half (180 degrees) of the swirled and rubber banded pancake. The whole thing went into a bag with SAS.
- Lemon Yellow was splashed on and the whole thing went into a bag with SAS and New Emerald Green dye.
The panties were just scrunched up and thrown in the baggies. They tended to come out a combination of the colors in their fraternal twin.
All the baggies and plastic shoeboxes were placed on a sunny flagstone patio to cure for 4 hours before rinsing and washing with synthrapol.
Have fun with your own tie-dye adventures.
keywords: tie-dye instructions, ziploc baggie dyeing instructions, Modern Motherhood
Addendum:
My vision is finally clearing up. The doctor says I can hope to be back at work in another week or two. Lying around in a darkened room, listening to books on tape, was getting a bit old. I did grow half an inch (according to the physician's assistant who measured me) from all the lying around in the past month.
These are beautiful! Very inspiring. I love tie-dye but haven't tried doing it in, dare I say, decades.
ReplyDeletegrace, i've been thinking of you lately because i've been gathering dyes and clothing from dharma! actually have dedicated some garage space to my tiedye supplies! and we now have the coolest beachtowels around having been custom dyed by us!
ReplyDelete