
I bought 5 balls (500 g) of Patons Classic Wool for the body/sleeves and 2 balls of Art Fibers Golden Siam (silk tussah) (100 g/330 yds) for the scarf. I used almost 4 balls of wool for the body and sleeves but decided against using the silk because the cables did not show up at all against the variegated yarn. (See the yarn in a prior post.)
The optimist in me tried to make a go of the cabled scarf part using the leftover wool. The finished sweater body weighed 210 g. The finished sleeves weighed another 190 g. I knit as far on the scarf as I could with the remaining yard and that measured 125 g and (and an optimistically streteched out) 47". The cabled portion should have been 54" but the picture showed that the scarf dangled below the hem of the cardigan.
I have read enough Maggie Righetti (Sweater Design in Plain English) to be wary of the funny sweater photo in VK. Notice that the wide end of the scarf is longer than the narrow part. That increases the weight imbalance between the two halves even farther. Look at how the model is standing with the wider side lower. To better balance the weight of the sweater, I wanted the narrow side to be longer.
 I sewed the wide side to the same length as the sweater and hoped that the narrow side would end up at the right point. I mattress seamed merrily along, row to row, except at the back neck, and discovered that I was about 6" too short.
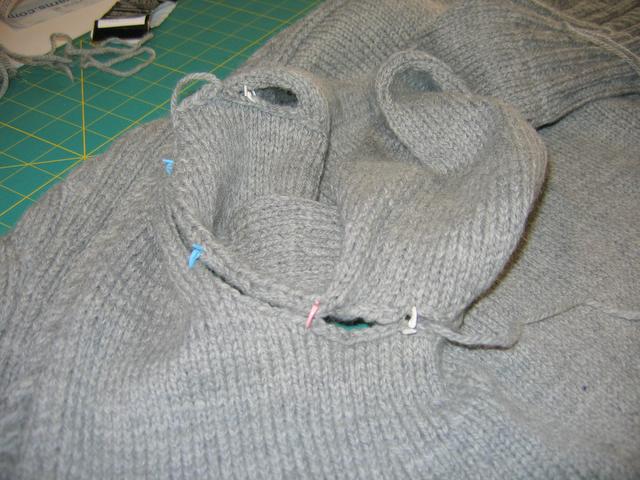 In the spirit of the improvisational Gees Bend quilters, I auditioned several yarns from my stash and choose a skein of Cascade 220 in a silvery gray. About 8" later, I bound off the Cascade 220 and continued seaming the sweater.
I should have mentioned earlier that I knit the sweater body in one piece and divided at the armholes. If you look at the pattern, you will notice that the decrease ratio when switching from the 3x3 rib to stockinette stitch on the fronts, back and sleeves vary quite a bit. After referring to the schematic, it was clear that Norah Gaughan meant for the sleeves to be straight and the body to flare out. Hence, the different decrease ratios. But the ratio for the back and fronts still varied and I could only surmise that it was due to the contortions of providing for a neat seam at the side in such narrow front pieces. I avoided the whole math thing by picking a reasonable enough decrease ratio and knitting the body in one piece.
 Then I short-rowed the shoulders and knit the back and shoulders together with a 3-needle bind off. I learned several short-row techniques and use a modified version of the yarn-over short-row. Nonaknits has an excellent tutorial on three short-row techniques.
 The inside of the shoulder is on top, the outside is on the bottom.
Finally, a picture of the completed cardigan reclining on BOSU. (Even on days I don't have physical therapy, I still need to do the exercises at home.)

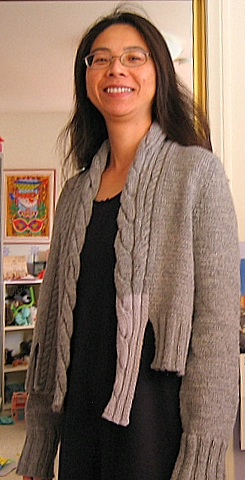 Who is that person with bedhead modeling the cardigan in her nightgown so her 6 year old can take a blurry picture?
The wrap-up
By sewing the right side of the scarf front higher than the designer intended, I also made the scarf wider at the neck than she intended. This pushed the sweater off my shoulders and caused the neck to fold back upon itself. With 20/20 hindsight, I should have eliminated one of the small cable repeats to cut down on the width. Also, the sleeves are just as long on me as on the model in Vogue Knitting. I could have easily eliminated 1-2" in length. If I had made those 2 changes, I would have had enough yarn. But, then I wouldn't have had that cool contrast color section.
Cable Tip
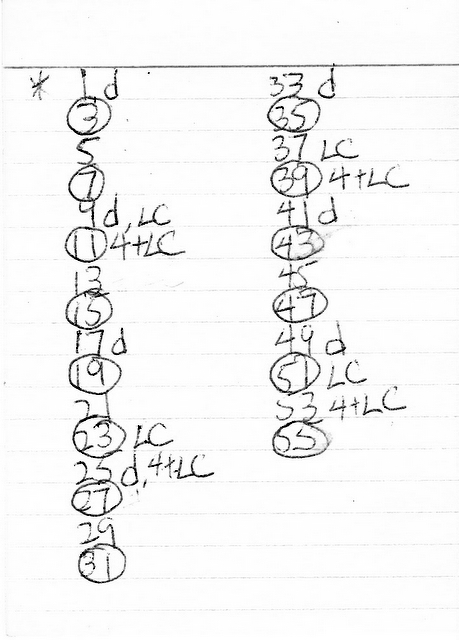 If you have been intimidated by cable charts and different sections of the sweater having different row repeat lengths, relax and try this.
The cabled scarf has 4 and 14 row cable repeats and decreases every 8 rows. The least common multiple of 4, 8 and 14 is 56. All the action takes place on the right side, the odd rows. So I wrote out a cheatsheet for myself with only the odd rows. See how I circled the rows where I need to make the small cables, marked decrease rows with a d and where to make the large cable move? If all else fails, use several row counters, one for each cable motif.
Click here for a simple explanation of least common multiple and how to determine one. For even more least common multiple fun, try this link.
Like Whoa! Awesome work!!!
ReplyDeleteAnd the lighter gray that you used looks great with your dark hair.